Tips for developers switching from Windows to Mac
Learn about some of the top tips that helped me make the switch from being a long time Windows user, over to Mac.

I was a Windows fan all my life, both at home since I was 10 years old, and at work for 8 years of my frontend development career. However, when I moved jobs recently I was given a MacBook Pro, and so I had little choice but to dive headfirst into everything MacOS. It was a bit strange at first and it honestly took me a few days to get settled in with the Mac, but once I did, I really started to like it.
From the beginning, there were a couple of things I missed about Windows, and some alternative apps that I had to find. In this article, I go through some of the things that helped me, in the hope that I can help smoothen the ride for other developers starting out on their Windows to Mac journey.
Package manager 📦
I used to use Chocolatey as my package manager on Windows. I found it really useful to install and organise all of my various packages, and so I wanted to find the best alternative for Mac. Brew was the answer! I've been using it for the past year and haven't had any issues or missing features compared to Chocolatey.
Terminal 📺
ConEmu was my go-to terminal on Windows and so I was pretty bummed out when I realised that it wasn't supported on Mac. After asking some folks on my team, they suggested iTerm2 and I must admit it's equally fantastic.
One feature that is not included in iTerm2 though is the ability to display the currently active git branch at a glance. Worry not! oh-my-zsh to the rescue 🦸♂️ You can install it using this curl command and hey presto, you now see those nice pretty git branches in your terminal.
Similar to ConEmu, I use a feature in iTerm2 called "window arrangements" to automatically launch tabs whenever I open the terminal. I find this really handy, as it automatically navigates to the correct directory and opens my regular 3 git, serve and test tabs for me. This feature has saved me countless hours over the years!
Finder 🗄
Finder is the default file manager on the Mac and it's equivalent to Windows Explorer, with some differences. The biggest difference for me was the lack of a classic cut and paste. On Windows you could simply press ctrl + x and ctrl + v. However, to do this on Mac you have to select the file and then press cmd + c and cmd + option + v.
Hidden Files
To show hidden files in Finder just press command + shift + ..
If you want to show hidden files by default just open your terminal and run this command:
defaults write com.apple.finder AppleShowAllFiles YES; killall Finder;
Split screen 💻
I often use split screen to view both the browser and VS Code side by side. On Windows, this is quite simple to do using a feature called Snap Assist. You simply just drag a window to the edge of the screen and then select the other window you want to show beside it.
Again I was pretty disappointed to find out that you couldn't easily achieve this on the Mac. Not to worry though, it does have a feature called Split View, which is close enough for me. It's not as quick and easy but gets the job done.

Window management app
A reader suggested Rectangle for split screen window management and I must say, I'm impressed!
MS Paint 🎨
Oh man, how I loved this app. As a frontend developer, I was constantly taking screenshots, pasting them into Paint and then drawing arrows, boxes and text on top of them to include in JIRA tickets, emails etc. I even remember using it to create some icons back in the day. I couldn't believe the Mac didn't have a native paint app. However, I found two solutions that helped me dry my tears.
1. Shape detection in Preview
I may be easily amused, but this feature blew my mind when I first tried it. When you take a screenshot (command + shift + 3), a thumbnail will appear in the bottom right corner of the screen. Once you click on the thumbnail, the native Preview app on the Mac will open. From here you can draw a rough circle, square, or arrow and if it's recognised as a standard shape, it’s replaced by that shape. How cool is that?!
2. Sketchpad
One drawback to the native Preview app is that you can't simply copy and paste two images onto one canvas. Again, I do this a lot when creating "before and after" screenshots of tasks I'm working on. It's so much easier to convey this in one single side-by-side image instead of two separate ones.
Again MS Paint was great for this, so I had to find an alternative. I tried lots of Mac apps, browser extensions and web apps but struggled to find anything suitable, user friendly, and free, which had similar features to MS Paint. Finally, I found it! Sketchpad is a fantastic web app where you can quickly copy and paste images side by side, draw, add text, fill vectors and lots more.
Screenshots and video recording 📹
I touched on this earlier, but as a frontend developer, I take a lot of screenshots and recordings so that I can attach them to JIRA tickets, Slack messages, emails and so on. I think that this is an important part of any frontend developer's workflow, so I wanted to go through it in a bit more detail.
Basic screenshot
Using the command + shift + 3 shortcut, you can take a screenshot of the currently active screen. You should then see a thumbnail appear in the right bottom corner of your screen. Clicking on this will bring up the native Preview app, which (as mentioned earlier) you can use to draw on the image. It will save the image to your default screenshots folder on your Mac, which is useful if you want to refer back to it later.
Capture a portion of the screen
Using the command + shift + 4 shortcut, you can take a screenshot of a portion of the screen. This will save the image to your Mac. Out of all the screenshot options, I probably use this the most.

Capture a portion of the screen and copy to clipboard
Using the command + shift + control + 4 shortcut, you can take a screenshot of a portion of the screen. The difference between this and the previous shortcut is that it will only copy the image to your clipboard. It will not save the image to your Mac. This is useful if you want to quickly copy and paste screenshots into chat or an email body, but not take up space on your hard drive.
Screenshot a window
Using the command + shift + control + space shortcut, you can take a screenshot of a particular window.

Record the screen
Using the command + shift + 5 shortcut, you will see a toolbar appear which allows you to record the entire screen, or just a portion of it.

To stop recording, just press the same command + shift + 5 shortcut again and press the "stop" button. I use this very often in PRs, or when showing my team some early progress of a feature I'm working on.
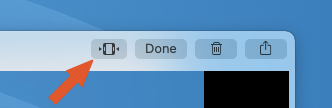
You can even trim the beginning and end of the video using this button:
Noteworthy screenshot app
I thought it was worth calling out a great free tool which I've found very useful called Shottr. It hasn't fully replaced the native screenshot functionality for me, but it's mighty close.
Shortcuts ⌨️
First of all, the keyboard is subtly different compared to Windows. The command key is what you'll use for most shortcuts and commands, it's mostly similar to the ctrl key on Windows. In most cases, shortcuts that require the use of the alt key on windows will use the option key on Mac.
Once I got used to these differences I started to look up various shortcuts for applications I use every day. Below are only some of the shortcuts I use, but here is the full list if you need it.
Basics
| Shortcut | Description |
command + x | Cut |
command + c | Copy |
command + v | Paste |
command + w | Close window |
command + z | Undo |
command + spacebar | Open spotlight to quickly find and open apps, documents, and other files. |
command + tab | Switch apps |
command + n | New finder window |
command + delete | Delete file / folder |
command + shift + . | Show hidden files in Finder |
control + down arrow | Show all windows of the active app (i.e all Chrome windows) |
command + shift + 3 | Take a screenshot of the currently active screen |
command + shift + 4 | Take a screenshot a portion of the screen |
command + shift + 4 + space | Take a sccreenshot of a window of your choosing |
command + shift + control + 4 | Take a screenshot of a portion of the screen and copy it to the clipboard |
command + c then command + option + v | Cut and paste files in finder |
enter | Rename selected file or folder |
Text editing
| Shortcut | Description |
command + left arrow | Go to beginning of line |
command + right arrow | Go to end of line |
command + control + spacebar | Show Emoji viewer 😃 |
command + shift + v | Paste without formatting |
option + backspace | Delete word |
command + backspace | Delete all text left of cursor |
Chrome
| Shortcut | Description |
command + option + i | Open dev tools |
command + r | Reload page |
command + f | Search within the page |
command + shift + t | Open last closed tab |
Slack
| Shortcut | Description |
command + shift + c | Format higlighted text to code |
command + k | Quick switcher |
command + shift + u | Add link text (You can also paste a link directly onto highlighted text to achieve the same) |
iTerm2
| Shortcut | Description |
control + u | Delete line |
control + y | Restore previous deleted line. This is handy if you need to run another command then come back to the previous one. |
command + t | New tab |
VS Code
For VS Code, I have customised a lot of the shortcuts myself as I personally think they make more sense and are easier to remember, so I've included them below. However, here's a list of the default out-of-the-box shortcuts.
| Shortcut | Description |
command + click | Go to definition |
command + p | Quick search |
option + left arrow | Go back |
option + right arrow | Go forward |
command + d | Copy lines down i.e duplicate line of code |
control + e | Add cursor to next matching text |
command + / | Comment out line |
command + backspace | Delete line |
command + \ | Open file in side pane |
Final thoughts 🤔
You might wonder if I miss Windows for frontend development, well my answer is "kinda but not really". Yes, Windows does some things better, but Mac has some of its own advantages. I think Mac is a happy medium for software developers who work on a lot of backend code as it's based on Unix, runs most Linux applications but is still user friendly. However, as a frontend developer, all I really need is VS Code and a browser to do my work, both of which work exactly the same regardless of which OS I'm using.
Hopefully, this article can make the Windows to Mac switch that small bit easier for you. If you found this article useful, or have some tips of your own, feel free to leave a comment 🙌
Useful resources 📖
I found these resources useful when learning the basics during my Windows to Mac switcharoo:
Want more? 📢
I mainly write about real-world tech topics I face in my everyday life as a frontend developer. If this appeals to you, then feel free to follow me on BlueSky. 🦋
Bye for now 👋